Hello out there in crochet land! I've revised my Deer Head Applique pattern. I've made a couple of minor changes regarding the spacing of the antlers and ears, and I now have a complete picture tutorial to help you all along. I'm working on putting it all together in a PDF so that you will be able to download it. I'll update you all and include the link for that once it is complete. Please feel free to follow me on Facebook for more updates on patterns that I will continue to post. My Facebook page is HERE.
*For the original pattern please go HERE.
*For the purpose of this tutorial I have used a 5.5mm hook so that the details are more visible.
HOOK SIZE 3.25MM
HEAD-
R1- Chain 3, SC in second ch from hook, SC in next chain. Turn.(2 SC)
R2- Chain 1. 2 SC in each stitch. Turn. (4 SC)
R3- Chain 1. SC in each stitch. Turn. (4 SC)
R4- Chain 1. 2 SC in first stitch. SC in next 2 stitches. 2 SC in last stitch. Turn. (6 SC)
R5- Chain 1. SC in each stitch. Turn. (6 SC)
R6- Chain 1. 2 SC in first stitch. SC in next 4 stitches. 2 SC in last stitch. Turn. (8 SC)
R7- Chain 1. SC in each stitch. Turn. (8 SC)
R8- Chain 1. SC2tog, SC in next 4. SC2tog. Turn. (6 SC)
R9- Chain 1. SC in each stitch. DO NOT TURN. (6 SC)
R10- Chain 1. SC around the entire piece putting 2 SC in the first and last single crochets from R9. Slip stitch in the first SC. DO NOT FINISH OFF. (See PIC 1)
LEFT EAR-
Chain 5. Slip stitch into second chain from hook, SC in next, HDC next, SC next (see PIC 2), slip stitch into the single crochet that your chain started from (see PIC 3). Now, you will be crocheting on the opposite side of the chain. SC in first ch, HDC next, SC next, slip stitch into last stitch. Finish off.
RIGHT EAR-
Count 8 spaces from the left ear and join your yarn (see PIC 4). This is where your right ear will start. Chain 5, slip stitch into the second chain from hook, SC in next, HDC in next, SC next, slip stitch into the single crochet that your chain started from and start working on the opposite side of the chain. SC in first ch, HDC next, SC next, slip stitch into last chain. Finish off. *Tip* At this point I usually go ahead and weave in the ends that are on the ears. It gets them out of the way and makes the piece easier to work with. (see PIC 5)

Here is what you should have so far.
ANTLERS- (There will be step by step picture directions for the right antler and condensed photos for the left antler.)
You will start with the right antler and work your way over to the left antler without breaking your yarn until that last antler is finished.
RIGHT ANTLER-
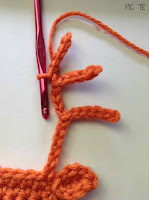
Join yarn in the single crochet directly to the left of the right ear. Chain 12 (PIC 7A).
 Slip stitch into second chain from hook, then slip stitch into the next 4 chains . Chain 9 (PIC 7B).
Slip stitch into the second chain from hook, then slip stitch the next 4 chains (PIC 7C).
Chain 6 (PIC 7D).
Slip stitch into second chain from hook, then slip stitch the next 4 chains (PIC 7E).
Slip stitch the rest of the way down. Slip stitch into the SC that your chain started from (PIC 7F).
Slip stitch into the next single crochet. Chain 4, slip stitch into second chain from hook, then slip stitch the next 2 chains, slip stitch into the single crochet your chain started from.
Slip stitch into the next 4 single crochets. Chain 4, slip stitch into second chain from hook, then slip stitch the next 2 chains. slip stitch into the single crochet your chain started from.
LEFT ANTLER-
Slip stitch into the next SC. Chain 15. Slip stitch into the second chain from hook. Slip stitch the next 4 chains. Chain 6 (PIC 8A).
Slip stitch second chain from hook. Slip stitch the next 4 chains on your chain 6 (PIC 8B).
Then slip stitch the next 4 chains. Chain 6 (PIC 8C).
Slip stitch second chain from hook, the next 4 chains from your chain 6 and all remaining chains until you are back at your starting SC. Slip Stitch into your starting SC and finish off (PIC 9). You can leave a long tail for sewing, but I like to sew my appliques on with sewing thread instead of yarn. I think that it looks nicer that way.
As always, please feel free to sell anything you make from my patterns. Please do not sell, alter, or distribute my pattern as your own, but feel free to share the link anywhere you like. Please do not use my images.


